
My brother Nick died this last November after over three years of battling lymphoma. Besides leaving behind his many loved ones and friends, he left behind a rather large, wooden cross.
In August my wife and I decided to move our family out to Colorado with the hopes of spending some quality time with my brother, however long he might have. About that time, he and his fiancé Victoria decided to set an earlier wedding date, realizing that time might be short. And on September 28th, 2014, they got married.
It ended up that the ceremony would not be in a church (surprisingly the church they scheduled had canceled on them a few weeks before the wedding), and so they asked me to build a wooden cross that they could be married in front of. I, of course, obliged.
Constraints
There were a couple of interesting challenges I faced in this project:
- Not in my environment: All of my tools and other resources were back in California. I would have to creatively make do with less.
- Short time: It would need to be done in about a week but outside of my business work hours, which meant early mornings, late evenings and full weekends.
Additionally, they had a few specific requests:
- Not look like pine: Victoria preferred a richer color.
- No adornment: They wanted it simple (no flowers, drapery, etc.).
Resources
Garage of the father of the bride: Bob generously let me make use of his garage. Although it was set up for automotive work and he doesn’t do any woodworking, it was invaluable. He also became quite a buddy in the process. Here are some of the things he had:
- Small circular saw (~3″)
- Medium size miter saw (~7″)
- Pneumatic tools (including a hand orbital sander)
- Cordless drill and standard bits
- Socket wrenches
- Accessories
- Ear muffs, gloves, safety glasses
- Tape measure
- Mallet
My car: Just a sedan with car seats in the back. Bob also had a truck, which came in handy later.
The rest I either bought or improvised.

Research
I think Nick and Victoria figured I would make a cross about as high as your chest, but I had a vision of what I could do: a tall, substantial cross that everyone in the audience could see. Later, I searched images on the web to see what others had done, but mostly saw things that were too small (less than 5 feet high) or without much depth (using 2×6). Those images and this site, however, gave me a good sense of the importance of the cross’s proportions.
The Problem of Proportion
Thinking through the various standard sizes of available lumber, I realized a certain thickness of wood would be required if I wanted the cross to be tall and look substantial. For example, a 10 foot tall cross using 4×4 would look really thin, but buying long pieces of thick lumber seemed too heavy and cost prohibitive. I considered building a hollowed out cross, but quickly dismissed it since I did not have tools for cutting, joining, gluing/clamping, etc. I decided to research lumber yards that carried large pieces of lumber.

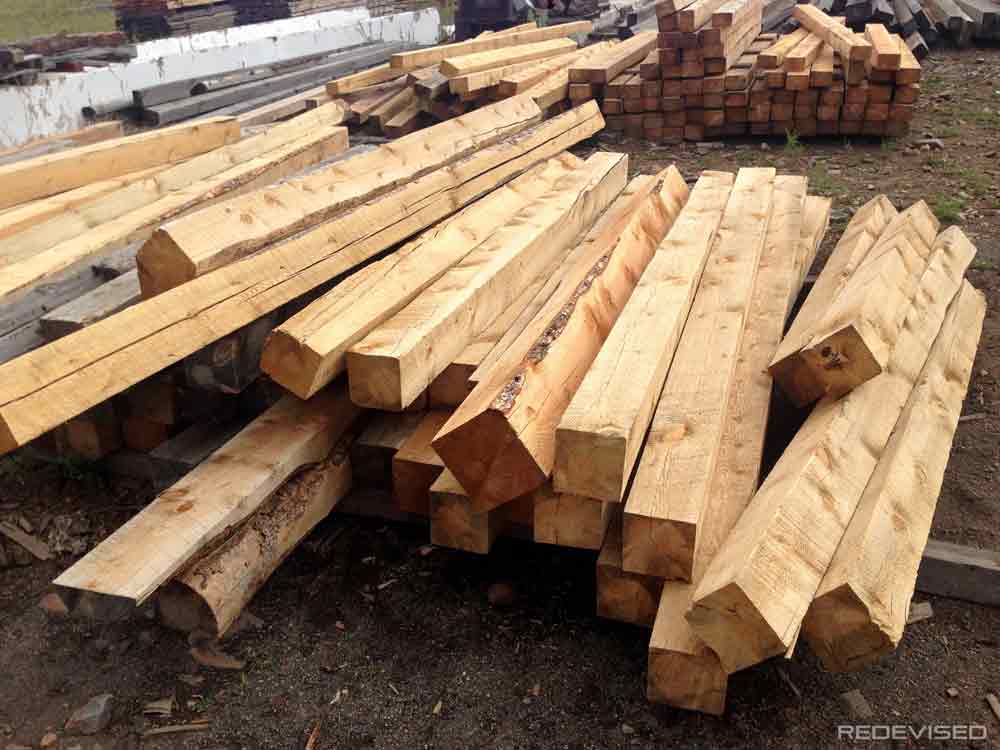
Identifying the Wood Source
I investigated reclaimed lumber, which ended up being even more expensive. But then I happened upon a simple, old-fashioned lumber yard that was close by: Olde Tyme Lumber. They were exactly what I wanted. I believe much of their wood comes from beetle-killed trees, and they cut rough lumber to whatever size you want, carrying stock of true 6 inch square beams.
Seeing the 4×4 confirmed that it was just to small for this project. I liked the 8×8, but it was huge and heavy and there was no way I was going to get that home in my car. The 6×6 looked good, and somehow, surprisingly, fit in my car though a hole in backseat that is just slightly larger than 6 inches square. I think I paid $25 for that 14 foot beam, and I tipped the guy $5 just for helping me get it in my car. This is about a third of what a smaller beam would have cost at a home improvement store.


Design
I didn’t do much sketching, but I did think through what I wanted people’s visceral response to the cross to be.
- The look
- Tall, above us so everyone there can see it
- The cross beam should come out slightly (i.e. not be flush)
- Stain with deep, warm color
- Low gloss finish
- The feel
- Smooth but rustic with distressed edges
- Feel big and substantial
- Solid and sturdy
- The construction
- Ideally from a single piece of wood
- This comes from family joke I knew would come into play regarding the hopa scene from Meet the Parents
- Mounted on a pedestal for stability
- Ability to assemble on-site so it does not get damaged in transport
- Ideally from a single piece of wood
Building
Sanding
I spent an unbelievable amount of time sanding the rough wood down to a clean, smooth surface (more than the entire weekend). Bob must of thought I was crazy, but I knew the look and feel I was after.
I started out using his 5″ pneumatic orbital sander (shown in the picture). Ultimately it was too weak, slow and jittery, and since there were no holes in the disk for the dust to be removed through, the pads kept falling off as soon as the dust crept into the sticky backing of the sanding pad.
I eventually gave up on it and went to Harbor Freight and bought a portable belt sander. I went through several belts and more than once had to resurrect the motor from burning out. In the end though, it was a trusty tool that got the job done. And the best part about that milestone was not getting anymore splinters; Bob and I must have gotten a hundred of them in our hands just from moving the wood back and forth.


Cutting
Cutting the beam required some improvising. Bob’s hand saw was old, rusted, and far from effective. My best bet was his miter saw.
Since it could only cut through a quarter of the beam at a time, I rotated the beam after each cut and finished the remaining part with the hand saw.
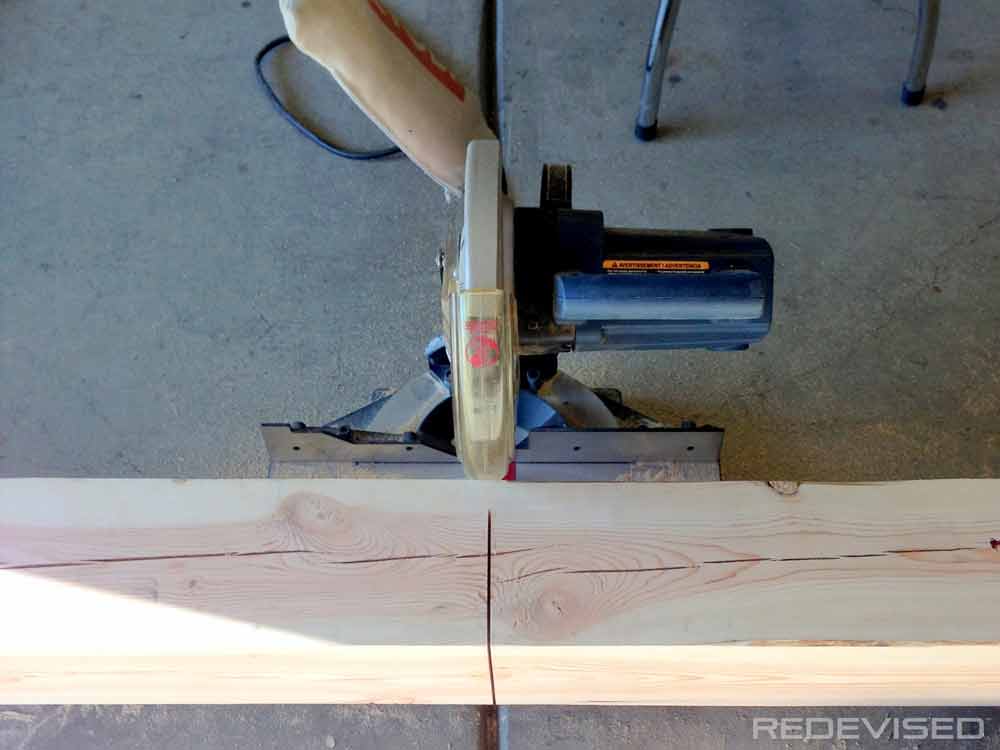

Next I needed to cut the notches of the halved joint. For this I bought some chisels and used Bob’s small circular saw to cut lines as deep as I could. They were easy to chip out, but after assembling the beams together, I saw I needed to go much deeper. I ended up just chiseling out some more and iteratively testing the assembled cross until it looked right to me.


Drilling Holes


Attaching the Crossbeam
I bought some beefy hex bolts for attaching the crossbeam; they were much bigger than I needed, but I liked the very substantial look of them.
To figure out the right bit to drill with, I usually line up the screw and the bit and choose the bit that most closely matches the width of the body of the screw (minus the threads).
The holes would go through the back of the crossbeam and partway into the back of the main post. I drilled some pilot holes first with a smaller bit, and then gradually worked my way up to the large bit. The bolts were then screwed in with a socket wrench.
Attaching the Base Brackets
Before drilling these holes, I needed to make sure the cross was level. I sanded the bottom and then stood it up, and then repeated that several times until I got it right. I also sanded the other end faces to make sure they were square, as well as the edges to give a slightly uneven, distressed look.
I bought some construction brackets, which were the biggest I could find at the time. I lined them up, used a pencil to fill in the holes, and then used the succession of drill bits to drill in to the appropriate depth. I screwed the bolts in with washers to distribute the load.
For a quick countersinking, I put the drill into full reverse and press the bit into the wood.


The Base
Originally I hoped that the brackets would be enough to keep the cross standing securely, but the brackets I got were far to weak for that. So I went back to the store and found massive, thick brackets, but it was too late–my holes were already drilled and would not line up with these brackets. So I built a simple base stand out of 2×4 using a halved joint again. I felt okay doing this because I really wanted to make sure it would not fall if someone bumped into it.
I cut the sides of the notch out with the circular saw, and then snapped it out with the chisel, giving me a nice little cube. After doing the same to the other piece of 2×4, putting the pieces together and making sure they were flush, I set the cross on the stand (with the brackets already on the cross), lined things up and drilled in the first set of screws. I then fastened smaller brackets in the joint of the base. Not sure if the base would be covered or not, I decided to sand it down and give it a rounded edge on the ends.


Stain & Finishing


At this point I needed to hurry and seal the wood, as the fairly green wood was drying out quickly. I chose Minwax’s Gunstock color because of its richness and warmth (as opposed to walnut, for example).
The initial effect was great, and I applied a couple of coats, which was actually a little challenging due to the size of the wood. I did this while laying the pieces flat to prevent any overlooked dripping. But if I did this again, I would have stood the beams upright because I left fingerprint whenever I moved or adjusted the pieces. I also went in with a fine paintbrush and made sure the stain went deep into the cracks.
After that had dried, I put on a few coats of paste wax, but polished it only to a low shine. For the base, I just used paste wax without any stain.
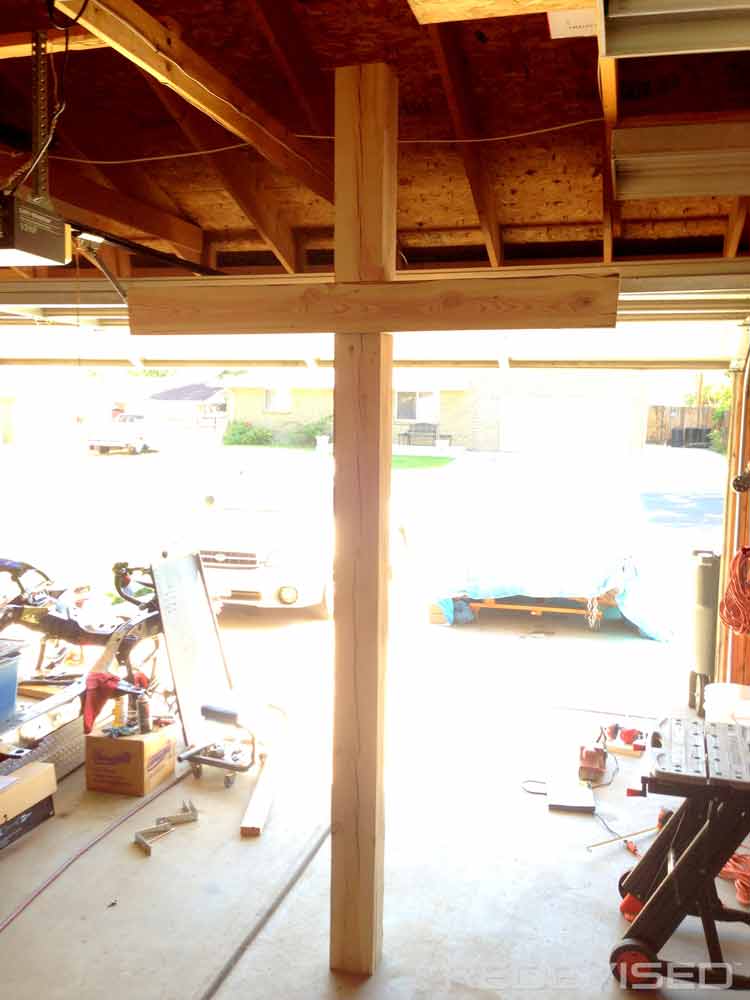
Assembly
The assembly was straightforward.
- Attach cross-beam and screw in hex bolts
- Screw in the brackets on three sides
- Lift entire cross upright and set it onto the assembled base
- Screw in remaining bracket and screws
I didn’t like how distracting the metal brackets were against the red wood, so I mixed up some red and black modeling paint Bob had to blend it in.
When fully assembled, the wedding cross was 5 feet wide and just under 10 feet tall.

Presentation

I had thoroughly considered carving something into the cross, as woodcarving is much more my strength than woodworking. However, I felt that nothing additional was needed, nor would enhance the wedding (and I wasn’t entirely sure carving something into a cross is religiously appropriate). Had I carved something, it would have been the Hebrew word חֶסֶד (‘hesed’), which has no English equivalent, but is closest in meaning to ‘loving-kindness’ and ‘steadfast-love’. I liked its dual meaning from the perspective of the cross and of the wedding.
Prior to the wedding, I disassembled everything but the base for transport, thinking it would be the only way to safely get it there. However, a failed to mark exactly which bracket lined up with which leg of the base.
At the wedding, in our rush to get ready, we screwed in three brackets only to realize the fourth did not line up well. Because we were running late, I went against my better judgment and tried to force the last two screws in. They didn’t go in all the way because the drill bit we had was too large (and was striping out the head of the screws). Borrowing a small screwdriver from the bar staff, I did my best to finish it by hand and then run upstairs to get my tux on.
Despite a slight forward lean due to the poor re-assembly, it looked great and exceeded Nick and Victoria’s expectations.
Needless to say, there was no disassembly. After the reception, we carried the wedding cross out to the back of Bob’s truck and drove it back to his garage. I came by the next day to fully tighten in those last screws because the project just didn’t feel done until it was done.
A month and a half later, we took that cross out and stood it up at Nick’s memorial service. To this day, I think it still resides in Bob’s garage…


Lessons Learned
If I were to do this project again, here are a few things I would have done differently:
- I would use gloves the whole time until sanding was complete. I had so many tiny splinters.
- I would use massively strong brackets for the base. The ones I used were very strong, but not strong enough to prevent a small wobble when you pushed the cross.
- No use disassembling it for transport. It fit fine in Bob’s truck and would have saved us a lot of stress right before the ceremony.
- If there is any assembly required, I would make it fool-proof. For example, I should used a pencil and marked one bracket and base leg to ensure everything lined up properly.
- Obviously, with the right tools, this project could have been completed fairly quickly.
Make time to be with the most important people in your life, to build great things for them out of your loving-kindness and steadfast-love.


how long were the base pieces
Hi M Gobbi,
The base was just a standard 2×4 (8ft long), which I cut in half. So each half was about 4ft. It was a touch wobbly, though I’d attribute that mostly to the L brackets being too weak.
Hi Tyler,
I am making one 8′ tall from 5X7 reclaimed hardwood. Trying to determine what size to make my base. Planning on face screwing a total of (4) 2×8 but not sure how long the 4 legs need to be. any thoughts on how to determine this? Due to the weight already I hate to make it any heavier than necessary, of course, but don’t know what size legs are sufficiently strong.
Obviously, trial-n-error is always an option but figure there is probably an easier way. Thanks in advance.
Since it is such a top-heavy object, I’d think the length of the legs would be more important than the leg height (2×8 seems like more height than you’d need). The pedestal I made came out a little less than two feet on each side of the cross, and what instability I saw seemed mostly because my L-brackets were too thin. It didn’t take much to make it wiggle, but it would have taken some effort to knock it over.
Since you are face screwing the legs, one idea to consider is tapering the legs. If you get 6ft of 2×8, cut it in half and then cut the halves diagonally to make right triangles. This will give you 4 pieces that are 3ft in length and taper from ~8in to a point. That will cut out some of the weight. Good luck!
Hello…im unable to see the dimensions etc…but what is the length of the beam, and the cross arm…thank you
Hi Michael, see this image in the Research / The Problem of Proportions section.
The height was 120″, the width 60″, and the center of the crossbeam was placed 30″ from the top; in other words; use a ratio of 4:2:1.
And for the base, I used 2×4 (8ft long) cut in half (i.e. each piece 4ft long). Depending on your project, you might want to make a stronger base (e.g. a bit wider with heavy-duty braces). Good luck!
Awesome job, I’m looking to do this for my daughter’s wedding.
STUNNING!!! Simple and elegant is always the best. And congratulations on your wedding. I am looking to build one myself.
Beautiful. I may need to build one for my daughters wedding.
How tall was it over all and how long across is the cross beam. At what height was the cut for the cross beam ..? Love the cross going to make it for my wedding . I appreciate it brother thank you very much
Check out the image above with the 3 crosses in it–it shows the dimensions you are after.
The cross was about 10ft tall, 5ft wide, and the middle of the notch was 30in from the top. It was put on a base made of 2×4 (so total height around 10’4″).
If you make one, send a picture–I’d love to see it.
I am in the process of building one. I’m going with 2×4 to reduce the weight. Cross is done. I’m working on the stand
That’s great Bruno. Email me a picture–I’d love to see it.
-Tyler
Thank you so much. This is the most important item I want my daughter to have at her wedding. I pray that I can figure this out, borrow tools, and get this done by July 2017. Prayers appreciated! Lorrie
I’m sure it will work out just fine, Lorrie. Email me if you need any tips once you get started.
-Tyler
My deepest condolences to you and your family. Your brother and his wife were and continue to be blessed with this tremendous gift you built for them.
My fiancé and I are having our wedding celebration on Tuesday November 22. Since that is also Thanksgiving week our local Church will be with limited staff and unfortunately cannot accommodate us for the ceremony.
The venue we found is outdoors and we want to honor our Lord and Savior by having a cross in the center of the ceremony circle.
Do you have any contacts in the South Florida area who could help me in building one or can? FYI I only took a wood shop class in high school to give you my background on wood crafting.
I consulted with our home Church but they do not know of anyone that provides this type of service.
We appreciate your time on reading this, will keep your family in our prayers and hope to hear some positive feedback or guidance.
God Bless,
Mitch
Hi Mitch,
Congratulations on the upcoming wedding. You only have a month, so if you’re going to make a cross, I’d recommend simplifying what I did. Use 4×4 (or even 2×4), which you can get pre-sanded at the local hardware store, and if you bring your measuring tape, they’ll even cut it for you. Creating the notch in the wood for the joint is probably the hardest part, so if you’re not up for that or don’t have the tools, consider using thick rope (perhaps using a transom knot). And you might be able to just plant the cross in the ground rather than making a base.
Let me know how things go. I wish you and your fiance all the best.
-Tyler
This cross is gorgeous!! Do you know roughly how much the finish product weighed?
Thanks. It was pretty heavy; I’d guess over 200 pounds. It took multiple guys to carry it due to its size and weight.
I’m planning to make one for my father’s funeral on 6/10/2017. I like the dimension of the cross you built. Thank you for sharing this information.
Sorry to hear about your dad. I hope the cross turns out well.
Wow, this was really lovely to read. Was looking for ideas for a cross for our church-plant and came across this story and how you documented your journey with building this cross.
Thanks Christine. Good luck with the church plant.
Hey Tyler first off, awesome job on the cross! I’m actually building a cross for my wedding and saw this and thought I could learn a thing or two from someone that has accomplished it. Your tips have really opened my eyes to everything that is involved. What kinds of challenges did you have with the venue? I am only asking because I am getting Married at the exact place your brother had he’s and if you can give any feedback of things they allowed or didn’t that would be greatly appreciated.
Aloha
Hi Eric,
I recall the venue being very accommodating in making things go how my brother and his fiancé wanted. They allowed a bouncy house downstairs for the kids, catered food, decorations, photos taken where they wanted, a big wooden cross brought in, etc. A beautiful place and kind staff too.
Congrats on the engagement, and best wishes.
Hey Tyler, the cross is beautiful. I just finished one for my daughters wedding. I found your site while researching how to build a cross and used your story as inspiration. I used your pattern to build it, with just a few changes. Thanks for sharing this journey, I believe you have inspired many others in doing so.
Thanks!
Brian
Wow, thanks Brian.
Tyler,
Just wanted to say thanks for the time you took to create this web page. I just built a wedding cross for a friend, and used all your advice to make it look good. The end result was fantastic.
Thank you so much.
Cheers,
Bill Juniper
Gainesville, Florida.
Thanks Bill. I’m glad to hear it worked out for you.
-Tyler
I am the Senior Warden of an Episcopal Church in Philadelphia and I had a large sweetgum tree removed and they left the 12 ft trunk as I requested. I was hoping to have it chainsaw carved but could not find a carver. I saw your article and decided to use my mechanical skills in wood working to cut away the excess wood with a chainsaw rigged on a drop guide to insure I get my 8×8 12 main post still attached to the base and roots of the tree. The cross piece will be removed as excessfor the horizontal. Using a heavy duty table saw I will trim it to get to the same 8×8 and I can trim the length to 5 ft.. What I was searching for when I found your article were dimensions for the wood and I can get 2 8×8’s out of the trunk I plan to mold the base of the trunk and have the main verticle 8×8 be the original tree. If it goes well I’ll send you progress photos and one of of it standing in the front lawn of the church and if not, we’ll be roasting steaks over a hot fire burning the attempted redesigned tree God created. Pray for us…
FRANK kOSINSKI
Philadelphia Pa.
Sounds great Frank. I’d love to see the pictures and hear how it turns out.
-Tyler
Thanks for sharing your story of the cross. I have built several over the years and appreciate your passion. “On a cross, on a hill that long haired boy was killed”. “All our sins washed away “. “When he stepped out of that grave”
Alan in Camden, SC
Thanks Alan.
Awesome! Doing what was asked of you and what God calls for us to do,great job on all accounts Tyler. I have put in a prayer garden in the back of my property and am going to build this cross to install there. Mine will be in the ground two feet and then have stone from my garden built up around it as a small alter Exodus 20:24-26
I looked and looked online and could only find small crosses or ones in ground made from 4×4 I think the 6×6 will look more substantial ! I also am going to make my notch the same as yours,(not flush with each other) Great job buddy!
Be blessed Tyler
John
Thanks John!
I was asked by a good friend to build a 10 foot cross for their wedding and I’m honored they asked me I volunteered to do it for free but they insisted they pay me well my question is will I have the same result if I use cedar wood ?
Sure, I think cedar would look great and work out nicely, assuming you can get your hands on a large enough piece of it.
Last question dont know if it was a typo but you wrote you bought a 14 foot beam for the whole job or 14 beam then a 5 footer?
The cross I made was was slightly smaller than 10 feet tall and 5 feet wide, but a 2:1 ratio of height to width is what you are looking for.
Make sure to take a close look at the drawing above in post that shows the three crosses; what will show you the proportions and where to place the crossbeam.
Hi Tyler. I am going to try and build a cross out of 12X12 oak wood. The lumber I have from building concrete overpasses over the hiway. I think The cross will be 30’ tall with 15’ cross. My problem is going to be the wood I have is 20 feet long and 15 feet with a 10 foot top. I’m not sure how I’m going to connect all three pieces together. Thanks for sharing your building of the cross and the awesome love of two brothers. I’m sure your parents are very proud of you both
Wow, that will be substantial! You might consider using a steel dowel when connecting the top and bottom parts of the main shaft (as well as large bolted steal brackets, etc.). Best of luck.
Hello Tyler, and thanks for taking your time in putting together such a detailed site. Your info was very valuable.
I used a ruff cut 6×6 beam I picked up from a local sawmill that was 16 feet long, and I purchase a 4×6 for the cross beam.
I put it 3 feet deep in my back yard to grace our back patio.
I dont see that I can load a picture on this forum or I would post one.
Thanks again,
Patrick
Thanks Patrick. I’m glad to hear it worked out well.
Hey Tyler – what was the offset on the front – I know you worked with it to get it just right. Looks like about 1/2 inch? I’m building one now.
Thanks
James
Hi James. I didn’t measure it, but I’d guess that it was just shy of an inch.
-Tyler
Looks great. I’m going to build one with lights for my outdoor Christmas display. Got treated 4×4. Planning 10′ by 5′. My question is did you cut that notch out of the main post or the cross beam? Also any suggestions for the non talented guy to make a decent stand to hold this up? Assuming I’ll need to put some sandbags or something to sturdy it especially with wind and what not.
Hi Adam. I notched both the main post and crossbeam so that neither were too thin at the joint. I then fit them together, kind of like Lincoln Logs.
For the stand I used a similar joint, though I used 2x4s–just make sure the brackets you use are hefty (the ones I used were rather weak for such a large piece of wood). Sandbags are a good idea if in a windy place. Or, if the setting permits, it might be interesting to make the main post extra long and bury it deeply into the ground.
You did an awesome job Tyler. Im making my crosses out of 4x6x10 pine. I do carve on both beams. These are used at funerals and grave markers. I dont think its sacreligious to carve on the cross although thats my opinion only. Not wanting to offend anyone. I use an electric hand planer to smooth out the wood at first and an electric sander to finish out the wood surface. I apply Minwax golden pecan stain and Minwax polyurethane finish. It really brings out the wood.
Thanks Manuel.
Tyler, what a meaningful gift for the wedding and a beautiful tribute to your father. I want a cross to display at Christmas and Easter. The cross used in the crucifixion of Christ would not have been sanded or stained. Since I’m going for the look of the old rugged cross, can I get away with no sanding or staining and have it hold up over the years? We may do some very light sanding and a sealer, if necessary, to preserve it.
Thanks for your great DIY notes and lessons learned!
Hi Martha. You might consider distressing it and sanding off sharp edges first to create more of an aged look, though I would still recommend doing a light sand and seal to preserve the cross and your hard work. If it will be staying outside, the wood will fade/degrade primarily if it is in contact with water, sunlight, and pests like termites. However, if it is just Christmas and Easter, that is not a big concern.
Nonetheless, even if it does age poorly, you should be able to sand off the outer layer and bring it back to a fresh wood look.
Best of luck with the cross you build!
What a beautiful gift you gave to your brother and your family. Well done. (I was looking for dimensions for a thick stained glass cross, and ran across your post.) True grace.
Thanks John!
Hi Tyler!
Loved the Wedding Cross. My daughter is getting married in 3 weeks and we want to make one of these for the ceremony. I want to use the 6′ x 6′ x 14′ but I do not want to use pressure treated wood as they want a very blonde, light colored finish on the wood. What wood did you use? It seemed to sand down to a light color. They would like to put the cross in their back yard after the wedding. Did you use Pressure treated wood for you base? You make several references to heavier duty angle brackets, but could you be more specific?
Hi Jennifer. I didn’t use pressure treated wood, just raw lumber from a lumber yard. Not sure which species–probably pine. Sounds like that would work for you; pretty much any softwood other than redwood.
If it is going to be outside, you definitely want to coat it with spar urethane, several coats. Putting that on will yellow it though, so if you want it very light-colored for the wedding, coat it afterwards.
I would use pressure-treated ground contact wood for the base if it is going outside. It might look better with thicker wood (perhaps 4×4 instead of 2×4).
You should look for heavy duty galvanized steel corner braces, perhaps 6″ or 8″. The key is the thickness of the steel; mine might have been only as thick as a quarter, which what insufficient.
Hey Tyler, just wanted to say thanks for the plan and hello from the arctic circle!
I’m currently up in the Northwest Territories on a mission trip and I just used this as a rough guide for a cross to go up on the wall in the sanctuary of the small church up here. I had to get a bit creative as resources are limited up here, but I was able to join a few gorgeous cedar boards together to end up with a beautiful milled cross that’s about 6′ tall, 3′ wide, and 5″ thick. All that’s left now is to finish it and hang it up on the wall. Any ideas on mounting solutions?
Hi Will – great to hear from you. That is a great question, in terms of how to mount that cross. My initial thoughts are to investigate floating mantel/shelf hardware (i.e. metal backplate with metal poles coming out that get embedded in the backside of the wood) and orient that vertically rather than horizontally. You could also try some hefty L-brackets that could hold up each arm of the cross. Best of luck!